
HONEYCOMB panels have become one of the most widely used materials in cladding and architectural facades due to their lightweight properties, high durability, and excellent thermal and acoustic insulation. To maximize the benefits of these panels, it is essential to install them correctly following the best engineering practices.
In this guide, we will provide a step-by-step process for installing HONEYCOMB panels easily and professionally, covering the necessary tools, preparation steps, installation methods, and expert tips to ensure a successful and long-lasting application.
Why Choose HONEYCOMB Panels for Your Project?
Before learning how to install HONEYCOMB panels, it is important to understand why they are an ideal choice for modern construction projects:
✅ Lightweight – Reduces structural load and facilitates installation.
✅ High Strength – Offers excellent resistance to impact and deformation.
✅ Thermal and Acoustic Insulation – Enhances building efficiency and comfort.
✅ Weather Resistance – Withstands extreme climates, making it suitable for places like Saudi Arabia.
✅ Eco-Friendly – Recyclable materials contribute to sustainable construction.
Essential Tools and Equipment for HONEYCOMB Panel Installation
Before starting the installation process, prepare the necessary tools and materials, including:
- Hand Tools: Screwdrivers, drills, measuring tapes, and cutters.
- Power Tools: Electric saws and precision cutting tools for accurate shaping.
- Fixing Materials: Screws, mechanical fasteners, and high-quality adhesives.
Pre-Installation Requirements
Before installing HONEYCOMB panels, follow these essential steps:
1️⃣ Surface Preparation:
- Ensure the surface is clean, dry, and free of debris.
- Verify that the mounting surface is level to prevent misalignment.
2️⃣ Measurement and Marking:
- Accurately measure the installation area and mark fixing points.
- Ensure that panels align correctly with the architectural design.
3️⃣ Panel Compatibility Check:
- Confirm that the panels meet project specifications.
- Test the fit before final installation.
Methods of Installing HONEYCOMB Panels
There are three primary methods for installing HONEYCOMB panels:
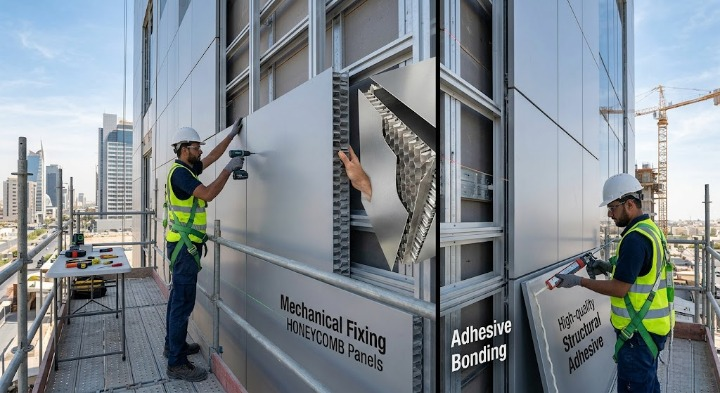
1. Mechanical Fixing (Using Screws and Fasteners)
- Provides high stability and is ideal for high-rise buildings.
- Recommended for heavy-duty applications where strong adhesion is required.
2. Adhesive Bonding (Using High-Quality Adhesives)
- Ensures aesthetic appeal with a seamless finish.
- Best suited for lightweight applications where mechanical fasteners are not required.
3. Hybrid Installation (Combination of Mechanical and Adhesive Fixing)
- Combines the advantages of both methods to ensure maximum durability and stability.
- Ideal for projects requiring extra security and longevity.
Step-by-Step Guide to Installing HONEYCOMB Panels
1. Preparing the Surface for Installation
- Clean the surface thoroughly to remove dust and debris.
- Ensure a flat and even surface to prevent installation defects.
2. Cutting Panels to the Required Dimensions
- Use precision cutting tools to achieve smooth and accurate edges.
- Handle panel edges carefully to avoid damage during installation.
3. Fixing the Panels Based on the Chosen Method
- If using adhesive, apply evenly and securely.
- If using mechanical fasteners, ensure proper alignment and tight fastening.
- Arrange panels in a uniform and structured manner for a professional appearance.
4. Post-Installation Inspection
- Check for panel stability and gap-free alignment.
- Conduct load-bearing tests to ensure long-term performance.
- Correct any installation errors before finalizing the project.
Safety Precautions During Installation
- Wear protective gear such as safety glasses, gloves, and helmets.
- Handle sharp tools and power equipment with care.
- Secure scaffolding and ladders when working at high elevations.
Factors Affecting the Quality of HONEYCOMB Panel Installation
- Climate Conditions: Temperature and humidity can affect adhesive performance.
- Material Selection: Choosing high-quality panels enhances durability.
- Installation Technique: Using advanced installation methods ensures optimal results.
Post-Installation Testing and Quality Checks
- Structural Stability Test – Ensuring panels remain securely in place.
- Thermal and Acoustic Insulation Check – Measuring efficiency post-installation.
- Aesthetic Evaluation – Ensuring a clean and professional finish.
Regular Maintenance for HONEYCOMB Panels
- Clean panels periodically to prevent dust accumulation.
- Inspect screws and fasteners for loose connections.
- Reapply adhesive or refasten panels if necessary.
Comparison of Different Installation Methods
| Installation Method | Timeline | Cost | Long-Term Efficiency |
| Mechanical Fixing | Medium | Low | High |
| Adhesive Bonding | Short | Medium | Moderate |
| Hybrid Installation | Long | High | Very High |
Common Installation Issues and How to Avoid Them
🚫 Misalignment of Panels: Use laser-guided tools for precise alignment.
🚫 Gaps Between Panels: Ensure tight-fitting panel edges.
🚫 Weak Adhesion: Use high-quality industrial adhesives.
Impact of Proper Installation on Panel Durability
- Enhances lifespan and performance of the panels.
- Reduces maintenance costs and need for frequent repairs.
- Improves building safety and structural integrity.
Regulations and Standards for Installation in Saudi Arabia
- Comply with local engineering and safety codes.
- Ensure panels meet thermal and acoustic insulation standards.
- Follow structural stability guidelines for high-rise buildings.
Cost of HONEYCOMB Panel Installation in Saudi Arabia
- Prices range between 200-500 SAR per square meter, depending on:
- Installation method.
- Material quality.
- Project complexity.
Latest Trends in HONEYCOMB Panel Installation
- Automated robotic installation for high precision.
- Advanced adhesives and mechanical fasteners for greater efficiency.
- Integration of smart materials for enhanced insulation .
Expert Tips for a Successful HONEYCOMB Panel Installation
✔ Use precise measuring tools for accuracy.
✔ Choose the right installation method based on project requirements.
✔ Inspect panels post-installation to avoid defects.
Frequently Asked Questions (FAQs)
❓ What is the best method for installing HONEYCOMB panels?
Hybrid installation provides the best balance between strength and aesthetics.
❓ How long do HONEYCOMB panels last after installation?
With proper installation and maintenance, they can last 20-30 years.
❓ Can these panels be removed and reinstalled?
Yes, but it may require replacing some adhesives or fasteners.
Final Thoughts
Proper HONEYCOMB panel installation is crucial for enhancing building efficiency, durability, and aesthetics. By following professional techniques, using the right tools, and ensuring quality standards, you can achieve a successful and long-lasting installation.